因为要使用tailscale(被tailscale的优美的ui吸引了,zerotier太丑),所以打算在当前主机上搭建tailscale的中转服务器derp。
注意:
需要:服务器、域名、域名备案
如果无域名或者备案、建议直接参考reference的第二篇: 浅探 Tailscale DERP 中转服务 | Kiprey’s Blog
安装
安装就按照官方教程来好了
安装go、derp、derpprobe
# go
# 下载
wget https://dl.google.com/go/go1.20.4.linux-amd64.tar.gz
# 解压安装
sudo tar -C /usr/local -xzf go1.20.4.linux-amd64.tar.gz
# 添加环境变量
echo export PATH=$PATH:/usr/local/go/bin >> ~/.profile
# 测试 输出版本信息即安装成功
source ~/.profile
go version

# 配置 go 代理并安装derper
go env -w GOPROXY=https://goproxy.cn,direct
go install tailscale.com/cmd/derper@latest
# 安装 derp probe 协助测试 derper
go install tailscale.com/cmd/derpprobe@latest
启动
证书申请
首先在域名提供商那里增加给derp的域名解析,保证域名能够解析到对应的服务器ip
然后启动derp
#运行 注意防火墙放行对应端口8080 8443 3478
sudo ./go/bin/derper --hostname=your.domain.com -http-port 8080 -a :8443 -stun
#申请证书
sudo certbot --email your.email@email.com -d your.domain.com

sudo su
cd /etc/letsencrypt/live/your.domain.com
ln -s fullchain.pem your.domain.com.crt
ln -s privkey.pem your.domain.com.key

sudo ./go/bin/derper --hostname=your.domain.com -http-port 8080 -a :8443 -certdir /etc/letsencrypt/live/your.domain.com -certmode manual -stun
# 此时访问https://your.domain.com:8443应该能正常访问了
# 编写derpprobe测试使用的map.json
{
    "Regions": {
      "233": {
        "RegionID": 233,
        "RegionCode": "useless-region-code",
        "Nodes": [
          {
            "Name": "test-derp",
            "RegionID": 233,
            "HostName": "your.domain.com",
            "DERPPort": 8443,
            "STUNPort": 3478,
            "InsecureForTests": true
          }
        ]
      }
    }
}
./go/bin/derpprobe -once -derp-map file://$HOME/map.json
全是good没有bad就配置完毕。
systemd自启动配置
接下来就需要配置derp的自启动和后台启动了
首先是编写启动脚本,按需添加–verify-clients防止白嫖,添加这个参数之后,只有这台服务器登录的tailscale账号才能访问这个derp中转
sudo vim ./go/bin/runderper

#!/bin/sh
cd /home/ubuntu/go/bin
nohup ./derper --hostname=your.domain.com --verify-clients -http-port 8080 -a :8443 -certdir /etc/letsencrypt/live/your.domain.com -certmode manual -stun > console.log 2>&1 &
echo $! > app.pid
编写停止脚本
sudo vim ./go/bin/stopderper.sh

#!/bin/sh
kill `cat app.pid`
rm -rf app.pid
编写systemd服务文件
sudo vim /etc/systemd/system/tailscale-derp.service

[Unit]
Description=derper service
After=network.target

[Service]
Type=forking
ExecStart=/home/ubuntu/go/bin/runderper
ExecStop=/home/ubuntu/go/bin/stopderper.sh

[Install]
WantedBy=multi-user.target原神启动启动脚本
sudo systemctl start tailscale-derp
# 查看服务的状态
sudo systemctl status tailscale-derp
# 没有报错就开启自启动
sudo systemctl enable tailscale-derp
配置Access Controls
添加如下结构,”OmitDefaultRegions”为true会屏蔽derp官方节点,按需添加
"derpMap": {
    // "OmitDefaultRegions": true,
    "Regions": {
        "900": {
            "RegionID":   900,
            "RegionCode": "MyDerp",
            "Nodes": [
                {
                    "Name":     "MyDerp-0",
                    "RegionID": 900,
                    "HostName": "your.domain.com",
                    "DERPPort": 8443,
                },
            ],
        },
    },
},
至此derp部署成功
测试
测试各个主机能否连接到对应节点
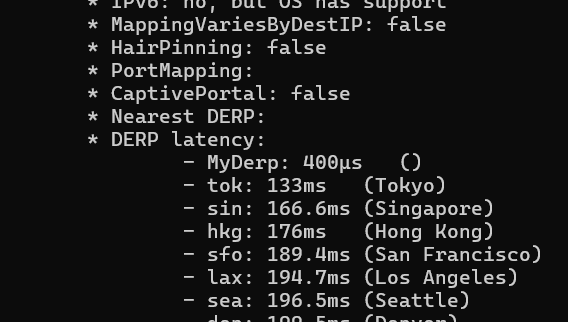
tailscale netcheck得到类如如同结果说明能够ping通tailscale节点
然后 access controls中的”OmitDefaultRegions”为true,屏蔽官方节点之后
tailscale ping tailscale-ip/name如果出现了过自定义节点的流量,说明配置成功。
ssl证书自动更新
# 测试证书更新,增加--dry-run参数测试是否能否正常更新证书
sudo certbot certonly --force-renew -d your.domain.com --nginx --dry-run

# 添加定时任务,进入后会让选择编辑器,选择一个熟悉的
crontab -e
# 增加一行
0 4 */7 * * /bin/certbot certonly --force-renew -d your.domain.com --nginx
发表回复
要发表评论,您必须先登录。